Thursday, April 14, 2016

A Pretty Edging

As I've been looking for ideas for the wedding garter I'm working on, I've found a few things that I won't be using but are too good not to share. To the right are my swatches of the Scalloped Edging by Judy Gibson from her website, tiajudy.com. The top swatch is three repeats worked in Size 12 perle cotton thread on US 000 (1.5 mm) needles. The lower swatch is only two repeats worked in Size 5 perle cotton probably  - - yes, I should have written it down - - on US 2 (2.75 mm) needles. What a difference!

These swatches are worked back and forth, but Judy also gives instructions for working it in the round (and for making a sweet lace bookmark).

I kept getting lost in the verbal instructions, so I made a chart. Don't freak out over all the black squares; they are just there as placeholders and require nothing on your part. The beauty of a chart like this is that you can see how all the stitches line up when one section increases while the other decreases. It certainly made it easier for me to keep track!

The cast-on is the straight edge. The bind-off is the curved edge and, as such, must be worked loosely. The rows numbered on the right are right-side rows and the ones on the left side are wrong side rows. (Of course, if you're working in the round, all the rounds are on the right-side.)  As the symbol key shows, I follow the convention that the chart shows the fabric as it would look on the right side.


Judy's site has more of her original designs plus eye candy she's knit from others' patterns. It's certainly worth a look!

Until next time . . .

Tuesday, April 5, 2016

I've Been Practicing?

In 1990, I made a wedding garter for my youngest sister. I started out trying to hand knit the lace on quadruple 0 (1.2 mm) needles. Okay, lace needles need to be sharp to facilitate working multiple stitches together, but when they're pointy enough to draw blood, you've got a problem. To make a long story short, I had to change my plan and use commercial lace.

I've designed and knit lace since then, of course, but I don't recall ever trying to work that small again. So a few weeks ago, when I picked up US 0 (2.0 mm) needles and some heavy thread, I was surprised by how natural it suddenly felt. I'm pleased to say that I'm now working on triple 0 (1.5 mm) needles with Size 12 perle cotton (shown to the right with sock yarn for comparison).

The impetus for this is our nephew's upcoming marriage. I asked his fiancee if she would like me to knit something for the wedding, and she asked me to make the garter. I'm so delighted to have a tangible way to welcome her into our family!

And I'm also glad that she asked for a garter. It's a small enough item, but it has so much creative potential! (I was a bit surprised, though, that now-a-days embellishments can include skull charms and flask pockets.) To corral all the potential, I set up a Pinterest board called "Bridal Garters". There are some DIY instructions for garters, bows, and silk flowers, and also a growing collection of knit edgings. And since this is a knitting blog, I will concentrate on the edgings.

I don't have a real idea about why it was suddenly easy to do fine knitting. I suspect that the US 1 (2.25 mm) needles I used for countless pairs of socks primed me for smaller needles. Certainly, I would suggest to anyone looking to work on very small needles to do some swatches or small projects on descending sizes of needles.

I'm still in the exploration stages of this project, but I've found a few interesting things to share with you in future posts. In the meantime, a couple of hints. I wish I knew this one in 1990: quilters have little adhesive ovals to protect their finger tips. I saw them on Jo-Ann's website, but I imagine other large craft stores and quilting specialty shops will carry them. The other hint is pictured to the right. Thread comes on spools that want to fall off the table and roll around on the floor. I'm using a ring stand to keep the thread clean! And I still have room for my rings!

That's it for now. Until next time . . .


Tuesday, March 22, 2016

Stitches West 2016


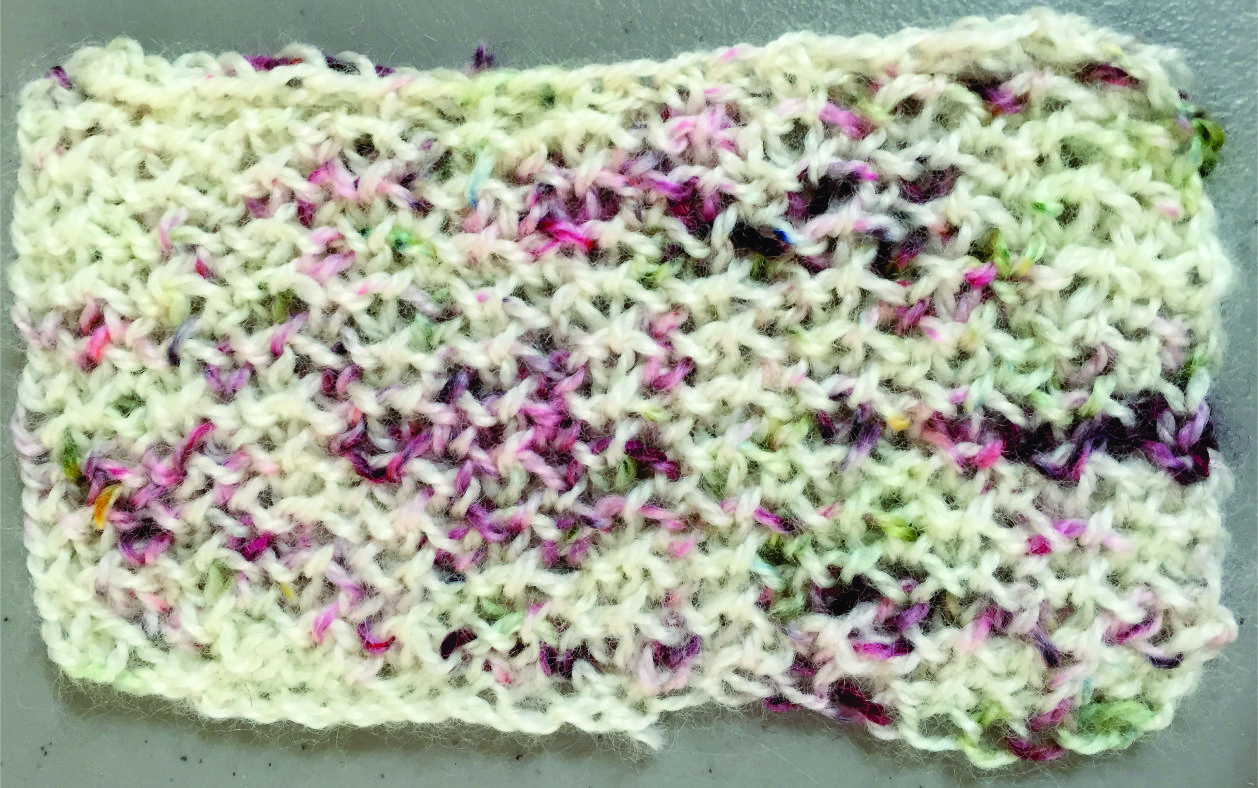
"But I don't need anymore yarn" loses all meaning when you get the opportunity to go to a giant fair like Stitches. There is so much to see and touch. And buy. Nevertheless, I was quite restrained, buying nothing but two hanks of fingering weight yarn.

The yarn in question is from Cozy Rabbit Farm. It's hand dyed and soft, soft, soft! The colors are pinks and greens on a natural background.


I did a really quick swatch just to get started, and before I was an inch and a half in, I realized that this yarn wanted to be knit into something squishy. Enter "Brioche Stitch".

For those of you not familiar with this, brioche is a type of knit fabric created with slipped stitches and yarnovers which are then worked together in various ways. The construction makes a plush fabric that can look lacy when stretched or worked on large needles. You will find some different brioche patterns in stitch dictionaries, but for the mother lode, you'll want to look at the work of author Nancy Marchant. All of the stitch patterns I swatched come from her book Knitting Brioche.


First up, I tried  "Mimi's Estonian Tuck Stitch" (page 143). This did not distribute the colors well; I was especially disturbed by the pooling in the upper left and the jarring dark strands near the lower edge. But look at the stitch definition in the closeup! It's easy to imagine this stitch pattern in a plainer yarn. (Hmm, my stash contains a rose pink merino/silk blend yarn with shiny bits of silver. That seems promising!)


 At any rate, there were two choices: pick a stitch with no obvious strands or one that is all obvious strands. " Moss Brioche Stitch" (page 115) is in the first category. It distributes the color nicely and has the added bonus of being reversible. I could have stopped there, but I had already committed to working a "strandy" pattern, so I continued on.


This is "Crossed Brioche Stitch" (page 122), another reversible fabric. I had worked the previous two swatches on US 2 (2.75 mm) needles, so of course that's what I started this swatch on. It proved too easy to make errors; tinking back was useless as the very small stitches got loose and just ran. So, what do you do when the stitches are too small? I went up to US 4 (3.5 mm) needles and that did the trick. The fabric is slightly open, has a lovely drape, and reminds me of Monet waterlilies. So what will I make with it? I don't know. It's certainly soft enough to wear as a cowl, but I have enough for something larger, perhaps a shawl or shrug. The strands are strongly diagonal, so working something on the bias would be really fun; the strands could then be horizontal or vertical and I could make blocks and hold them in different directions. Gotta think about that.


  I want to mention a couple of interesting things about this stitch.

One is the way it comes off the needles. It's really scary before you block it!

The other is the true strength of this pattern stitch; it's remarkable in two colors! The link above has instructions for it in one, two, and three colors.


That's it for now! Until next time . . .

Thursday, March 10, 2016

So, anyway . . .

I turned 60 over the summer and decided that if I am ever going to produce a knitting book, I'd better get to it! I figured that if I focused on that and did nothing else, I would soon have a whole stack of designs to chose from!

I have created some really cool stuff (if I do say so myself), but not enough yet for a book. In the meantime, I've missed blogging. So, here goes . . .


 When I use three colors for a cozy, I like to arrange them to form stripes. In general, I use two closely-related colors with one high contrast color. All the odd ridges (two rows each) are in the main color which is one of the related colors. The even ridges alternate between the two other colors, starting and ending with the high-contrast one. The effect, in theory, is three-ridge stripes in low-contrast colors separated by ridges of the high-contrast color. In theory.  Although this cozy is supposed to be gold and brown stripes separated by cream, what I'm really seeing is gold and cream stripes separated by brown. This is probably because dark colors appear to recede while light colors appear to advance. Either way, it's an effect I really like.


    I occasionally make four-color cozies. In this example, the main color, black, repeats every other ridge. The secondary color, gold, repeats every fourth ridge. I carry these two colors up the right-hand selvedge as usual. The red and the white repeat every eight ridges, so I join and cut these colors every time they are used. There are a lot of ends to darn in.


    Stitches West was three weeks ago, and I haven't had a chance yet to play with the yarn I bought. I'm going to start that right now, and hopefully have some swatches for my next post. Until then . . .

    Friday, October 16, 2015

    How to Seam the Cup Cozy

    First order of business: I edited the cozy instructions in the previous post to make them a bit clearer. If you've been having a problem, take a look there!

    Thread the long MC tail into a yarn needle. Hold the sides together so that the cozy is right-side out. Pass the needle under both strands of the first whole stitch across the gap and back down into the final bound-off stitch. Voila! The bind-off row looks completely continuous and the yarn is now on the outside of the work. (I use this technique to finish anything that should be round. I often use crochet slip stitch as the finishing touch on projects and the first and last stitches of that can be joined like this as well.)

    The next step is to take the needle under the head of the edge stitch on the left. This stitch is often distorted and the head may look vertical. If you look closely, though, you'll see that it is indeed the stitch. Cross the gap and go under the running thread between the first and second stitches on the right. Steps 3 & 4 repeat Steps 1 & 2, but from here on down the stitch heads will be obvious.

    For clarity, I kept the edges in the diagram apart but, of course, they will be coming together as you seam. Pull the yarn tightly enough that the rows look continuous but not so tightly that the seam shortens. (This is a bit of a balancing act.)

    When all the rows are joined, turn the cozy upside down. The threaded needle will be on the left of the gap. Take it under the outer strand of  the nearest cast-on chain. Cross the gap and take the needle from outside to inside under both strands of a chain stitch. (If the first stitch is not obvious, use the second stitch.) Cross the gap again and take the needle down into the stitch with the one strand coming out of it. This makes the cast-on look continuous and puts the tail on the inside where it can be secured and darned in. Secure and darn in the remaining tails, turn the cozy right-side out, and enjoy!

    Until next time . . .

    Thursday, July 30, 2015

    My Basic Cozy Pattern

    A number of years ago, I made myself a sewn cup cozy from directions in a magazine. I then sewed two more for friends, but when the requests really started coming in, I knew I had to come up with a knit pattern.

    Since then I have made DOZENS of these cozies. They are great fillers between major projects or when my current project is too big or complicated to carry around. The pattern is easily memorized and they use up leftover yarn. (Or they would if I didn't keep going out and buying new yarn!)

    I discovered early on that these were not going to be a real good money-maker, so I decided to give them away as random acts of kindness (though it's not really random if  you've asked the recipients in advance what colors they prefer).


    The pattern calls for medium-weight yarn as indicated by the number 4 symbol on the yarn wrapper. This symbol, though, encompasses quite a range of actual thicknesses. I usually use Vanna's Choice or Vanna's Choice Baby (which refers to the colors and not the weight). I've substituted Red Heart Soft Yarn or Caron Simply Soft on occasion when I've needed different colors, though both are lighter in weight. Of course, you can hold thin yarns together or use a heavier yarn with fewer stitches and rows.

    At any rate, the most important characteristic for the yarn is it should be WASHABLE. It will get spilled on.


    Size/Gauge: The cozy is about 4" tall and about 7.5" wide before seaming. This corresponds to 38 rows (including cast-on and bind-off) and 37 sts. Obviously, exact size and gauge are not critical for a project like this but it's based on garter stitch, so when in doubt make it a little snug.

    Supplies
    US 5 (3.75 mm) needles (or size needed to achieve gauge)
    F-5 (3.75 mm) crochet hook (metric size matches needle metric size) 
    About 18 yds. main color (MC) yarn 
    About 17 yds. total one or more colors contrast color (CC) yarn
    Six stitch markers
    Scissors
    Darning needle 

    Abbreviations
    pm: place marker
    sm: slip marker
    wyib: with yarn in back
    wyif: with yarn in front 

    I like using a cast-on that matches the bind-off. I call this "chain cast-on", though you'll probably find other names for it. You can find a video that explains it here. I work it very firmly so that the cozy becomes slightly tapered. If you know you're making the cozies for cans rather than cups, you can start out at a more normal tension.


    Row 1 (Right Side): With MC, cast 37 sts onto a US 5 (3.75 mm) needle using a size F-5 (3.75 mm) crochet hook.
    Row 2: K3, (pm, p1, k5) 5 times, pm, p1, k3.
    Row 3: Join CC. K3, sl1 wyib, (sm, k5, sl1 wyib), sm, k3.
    Row 4: K3, (sm, sl1 wyif, k5) 5 times, sm, sl1 wyif, k3.
    Row 5: With MC, k37.
    Row 6: K3, (sm, p1, k5) 5 times, sm, p1, k3.
    Rows 7 - 37: Continue in established pattern, changing color at the beginning of every RS row.
    Row 38: Bind off in MC in established pattern. (This means that the vertical stripes are bound off in purl and all the other stitches are bound off in knit.) 


    Cut yarn with a tail of about 12" of MC to use for seaming.

    Until I draw the diagrams for finishing,  I'm going to send you back to the post I wrote for seaming the Jack-o-lantern cup cozy I published in October 2012. While the two seams are a bit different, this will get you started!

     Until next time . . .

    Monday, July 20, 2015

    A New Published Design

    My latest design is in the Summer issue of Knitter's Magazine! It's a lacy counterpane called "Circle the Square". You can see its Ravelry page here.

    Any large project is a labor of love, but this one goes more quickly than most. It's in worsted weight yarn (yummy yummy Berroco Ultra Alpaca) on US7 (4.5 mm) needles. Also, the lace pattern has a very clear logic so it's easy to move through. I do hope you'll check it out!

    Until next time . . .