Monday, March 23, 2015

A New Published Design


(c) Knitscene/Harper Point Photography
It's been easy to feel smug about this winter's weather in San Francisco (although I do feel obligated to add "but we really need the rain"). My husband and I have been outdoors in short sleeves while our families and friends have been up to their ear lobes in snow. Hopefully, the worst is over and everyone's thoughts are turning to . . . Summer!

The Summer 2015 issue of Knitscene has been released and is now available here. (Paper copies will be available in mid-April.) My contribution is a good-sized wrap with a collar and scalloped trim (inset). It's worked in two linen-blend yarns from Classic Elite in Half-linen Stitch. The pattern stitch is easily memorized and knit and creates the most amazing fabric with the variegated Bella Lino yarn.

That's it for now! Until next time . . .

Wednesday, March 11, 2015

Stitches West!!!

Stitches West was held a couple of weeks ago at the Santa Clara Convention Center in (surprise) Santa Clara CA. The market, as always, was exhilarating. It was great to see the variety of yarn and - oh - the colors! I was able to catch up with some folks I don't often see and I had a wonderful, if exhausting, time.

My primary interest was finding yarns to design with. I wasn't disappointed.

First up is Rock Creek Sock in the Serengeti Sunset colorway from Wandering Wool. I was really looking for DK or sport-weight yarn, so I didn't buy it immediately. I was a couple of aisles away when the urge became irresistible and I figured I could always double it.

As it turns out, I swatched it single. This swatch is in Linen Stitch (also known as "Fabric Stitch") which is a slip stitch pattern. It is very, very dense, so I used US 6 (4 mm) needles for it. (I would normally use US 1's (2.25 mm) for sock yarn.) I just love the way the pattern stitch blends the colors; it's so quintessentially Autumn! The swatch still has lots of stretch.  I don't know that it would keep its shape well enough for a skirt or a tote bag, but I can't imagine anything else that it wouldn't work for.


The second swatch is worked in Hempton from Hemp for Knitting. It's a blend of cotton, hemp, and modal. This swatch is worked in Garter Slip Stitch VI. I got this stitch from The Harmony Guide to Knitting Stitches, but I also found it here. To do it in two colors, alternate colors every two rows. Only half the rows have slipped stitches, so this is less dense than Linen Stitch. I used US 3's (3.25 mm) which is only one needle size larger than I'd probably use otherwise. I think this fabric would make a great light-weight jacket, and, of course, utility items.


 Finally, I swatched the worsted-weight merino superwash from Polka Dot Sheep. The vendor told me it had good stitch definition, so I went all out with the pattern stitch. This beauty is pattern 51 from Aran Lace by Annie Maloney. I did it on US 5's (3.75 mm). It's the only one of the swatches that I actually blocked; the other two I soaked and just patted down on my table.

And that was my adventure! Until next time . . .


Wednesday, February 4, 2015

Do you want beads with that? Part 2

The beads I used for the swatches two posts ago are just plain, little plastic tubes as in the upper diagram. When the picots they're on twist, we see the holes and need to block to see the real parts of the beads.

"But," I thought, "maybe I can use the twisting." I went online to find beads with front to back holes as in the lower diagram, the idea being that when they twist, the good side will be front and center. Most of this type of bead that I located are quite large; certainly much larger than would be comfortable to wear in profusion. Nevertheless, if you're into beads, it doesn't hurt to keep your eyes open.

But I still needed beads, so I went to a local bead store and found another type of embellishment: CHARMS!

As I had hoped, the picots twisted to show the flat sides of the charms. Inexplicably, however, the picot with the butterfly twisted in the opposite direction to the picots with the flowers, leaving the wrong side facing. I ripped my swatch out, restrung it the other way, and this is the result!


 * * *

I have some final (for now at least) thoughts on incorporating beads and/or charms. It's been a bit tricky to find beads with holes large enough to pass yarn through but small enough to fit the
gauge of the pattern without looking crowded. The swatch to the immediate right, with a bead on every picot, comes pretty close; it's very cute, but not what I would want if I were going for a spare, elegant look. The swatch to the far right has the beads spaced every other picot (it's also in a heavier yarn).  Here, I stretched out the picots holding the beads which takes up the yarn from the unadorned picots. The slack would be good for longer beads and would still keep them from banging into each other. In the "charmed" swatch, I placed them every third picot and kept the shape of the remaining picots when I blocked. That one is my favorite of the three swatches but, of course, the final look of any technique depends on the context: the yarn, the embellishments, and the type of project being made. That's why we swatch.

That's it for now! Until next time . . .

Wednesday, January 14, 2015

One Month to Valentine's Day!

(c) ilikeknitting.com


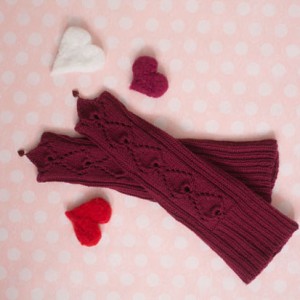
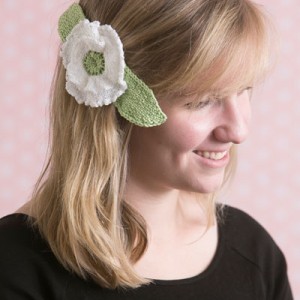
And just in time, I have two sweet designs in the February 2015 issue of "I Like Knitting."

The arm warmers are knit in Debbie Bliss Rialto DK, a very soft superwash Merino wool. (By the way, I use this yarn in many of my blog swatches.) A panel of lace hearts runs down the outside and they've got beads hanging from the point of the bottom heart. I've written the pattern in three sizes for teens and adults.

(c) ilikeknitting.com
The flower can be used as a hair ornament, as shown, or a piece of jewelry. This particular sample is worked in Patons Grace cotton yarn on US 5 (3.75 mm) needles, but you can try it in any number of reasonably smooth yarns. The stitch pattern is "Linen Stitch" so you will probably need to  choose needles that are relatively large for the yarn. The finished size, of course, will depend on the particular yarn and needles used.

Until next time . . .

Friday, January 9, 2015

Do you want beads with that? Part 1

I just had to add beads to the picot cast-on. It's pretty easy albeit fiddly. Start by stringing beads onto your yarn - more than you think you'll need. (It's a simple matter to push extra beads along until you are at the end of the yarn. It's not at all easy to add more beads once your cast-on is started.)


Using a crochet chain as the base for the provisional cast-on, pick up a st in the first chain. Slide a bead up against the waste yarn. Pick up a stitch in the next chain, slide a bead up against the waste yarn. Again and again. And again. (Don't put a bead after the last stitch, though.)


Work the first row in k1, p1 ribbing, then follow the pattern from Row 2. Continue working the pattern as written until it's the desired length and bind off. Undo the waste yarn.

I found in the swatch pictured above that the picots holding the beads wanted to twist very severely. I got a row of beads with their holes pointing to the front. Not attractive. I thought this might be a function of the tight twist on the yarn I've been using so I tried a yarn with less twist. There was still twisting of the picots.

The most obvious solution was to see if blocking would help. It does, but not as well in the tightly
twisted yarn (above) as in the more loosely-spun yarn which is used in the photos to the right.

I don't tend to use blocking wires because I find that they catch on my work, but here I was just putting a length through the holes in the beads. I stretched the other edges of the swatch as usual, and used T-pins to hold the wire in place.

Up next will be another take on the twisting picots, as well as some pondering on bead spacing. Until then . . .  


Friday, December 26, 2014

Hey, this is cute!


 This was an insight that should have occurred weeks ago, but only came recently: a provisional cast-on (PCO) would be an excellent way to achieve a really stretchy beginning for the crimped stitches! When the item is done, the PCO can be removed and the resulting loops bound off at the same tension as the stitches at the end. They have to be bound off, or your project might start unraveling from the beginning up.

But would it really? It turns out that k1, p1 ribbing cannot be unraveled from the beginning, so by substituting that for the first row of your pattern, you can just take out the waste yarn and that's that!

It gets better, though. This method forms cute little picots along the beginning edge.

There are a number of ways to do a PCO. I prefer the crochet chain method as it is very stable. Choose a waste yarn that is smooth and a good contrast with your project yarn.  A word of warning, though: if your project yarn is light in color, don't pick too dark a waste yarn. Even a smooth yarn can leave a bit of lint and red lint on a white project . . . not so nice.

Start by crocheting a chain in waste yarn with a hook that will produce stitches large enough to get your needle through. You'll need one chain for each cast-on stitch plus a few extra since the occasional chain may not be obvious when you go to pick up in it. Cut the waste yarn and pull the tail through the last chain to secure it.

Look for the back of the chain. (It's the side that doesn't look like a chain.) The bumps you see are the backs of the stitches. They will be oriented differently depending on whether you're holding the final chain to the right or the left.


Pick up the needed number of sts in the backs of the chains as per the diagram. Work Row 1 (RS) in k1, p1 ribbing. It doesn't matter which st you start and end with.

Continue with  Row 2 and the rest of the pattern stitch. Obviously, on subsequent repeats Row 1 will be as normal.

When you do the crimping row, make sure you go into the stitches as shown; don't go into the waste yarn chains. The heads of the stitches that appear as purls will be much closer to the waste yarn and it is easy to miss the stitches themselves.

Remove the waste yarn. If you've picked up the stitches correctly, you can just undo the last chain and quickly take it out. If not, you will have to work stitch by stitch. (It's usually a combination of the two.) In either case, be a little bit gentle so that the picots are not distorted.

Finally, block the piece. Wet and stretch it well. Pin the picots individually. Allow it to dry.

I did try this method on an extremely small seed stitch swatch without the crimping. It does form picots but not as prominent or nicely shaped. It's an idea worth pursuing on seed stitch, moss stitch, or, of course, k1, p1 ribbing, but I'm not going to go down that path right now. If anyone does try it, though, please let us know how it works out.

Until next time . . .


Saturday, December 6, 2014

Embroidering Beads On


The stitches used in this sample are so basic that I am almost embarrassed to call them "embroidery". (For real embroidery, you might want to check out this site. In a few minutes, I saw how to do some new-to-me stitches and learned about some unusual embroidery styles. More things I'm gonna wanna try! )

Do remember, though, that embroidery on knitting does not require a hoop; that would only crush the fabric.


The first step in this particular sample is to make a simple running stitch. Thread a yarn needle, secure the yarn to the back of the work, then take the needle to the front through the first space, to the back through the next, and so on. End by securing the yarn to the back. This step is shown in the salmon-colored lines in the following diagram.


The second step is called "lacing". Again, start by securing the yarn to the wrong side. Following the blue line, go up under the first running stitch and down under the second. At Point A, unthread the yarn needle, string a bead, and rethread the needle. Continue across. Be aware of how tightly you're pulling the yarn. The beads don't have to be super-snug against the fabric, but you certainly don't want the embroidery yarn to be pulled tight.


The second pass is shown by the green line for clarity only. You are still using the same strand of yarn. Take the needle back under the previous running stitch in the opposite direction from the first pass. At Point B, unthread the yarn needle, string a bead, and rethread the needle. Finish the row and secure the yarn on the wrong side.


Essentially, the passes are two opposing waves. The first pass forms troughs between every other pair of running stitches; the beads sit in these troughs. The troughs of the second pass fill the spaces in between those of the first; again the beads sit in the troughs.

Well, that's it for now. Please use the "Comments" if you have any questions.

Until next time . . .